Service delivery: Designed to last, chances of failure in use are minimal but obviously still get worn out.
The profit incentive: Productivity improvement is dependent upon the extent to which the enhanced capability of a better tool is utilized, even a small increase in efficiency can pay off. For example : Assume the cost of the time a worker spends litter picking to be £10,000 per year, that the worker loses 10 Litter Pliers a year (very careless) and each Litter Plier costs £10 more than a less capable product. To justify continued purchase of this tool it would be required to generate a 1% improved productivity over the potential of the cheaper product, a very small percentage if this is the product of preference, the actual improvement is likely to be considerably more when the worker appreciates the opportunity to deliver a better result.
Hand-held
Bag-holders
Sweep-in
Bag-holders
tel. / fax.
01902 674444


Note! Due to tooling problems the BLP3 handle is in limited production only.
Litter Plier Service Intervals: If used full time a 6-monthly service of the handle pivot and replacement of the grippers is recommended. For part time use life expectancy is open ended.
Litter Plier Service Hints:
Although it is impractical to return a worn Litter Plier to “as new cosmetic condition" it is usually completely possible to achieve “as-new operational condition".
1. Examine product for damage that could cause failure if put back into service.
2. Separate the handle halves at pivot.
3. If Litter Plier is a BLP2 (older model) replace the M5 nylon stop thumb screw in the finger-handle-half with a new one. (If broken off in the handle use the end of a heated flat blade screw driver to make a drive slot).
4. Clean components paying particular attention to the handle pivot face, the two nylon face washers, the PTFE face washer, the spring and the M5 bolt, nyloc-nut and flat washers.
Providing the nylon and PTFE face washers are not heavily scored they can be re-used; make sure they are assembled as a Nylon-PTFE-Nylon sandwich thus ensuring wear occurs on the washer interface, not the handle. If the spring has had less than 12-months daily use it can be re-used but otherwise replace.
5. The Nylon-PTFE -Nylon interface may be lubricated with a light oil but leave dry if to be used in very dusty conditions. The stainless steel spring, bolt and washers should be lightly greased.
6. Re-assembly of the handle pivot is best facilitated by locating the spring in the same side as the face washer sandwich. Use your thumb to cock the spring such that the exposed spring leg is raised allowing the mating handle half to be positioned over and engaged with the raised spring leg such that rotation of the handle halves allows them to be closed together and the pivot bolt inserted..
7. The pivot bolt M5 Nyloc nut should adjusted to hold the two handle halves in close contact but free enough to allow the bolt to turn without without excessive binding and allow free operational movement, of the limbs (not be sluggish or damped). Note: As the steel bolt expands less than the plastic of the handle the M5 nyloc-nut needs to be adjusted(set) to allow for the expected maximum operational temperature. (ie: you don’t want it to seize up if left in the sun).
8. When re-fitting tubes to the handle the gripper-face should be at right angles to the handle pivot-bolt centre line. If off-parallel (=>5deg.) the error should cause the grips to slide such that the limbs tend towards a cross condition, as there is more resistance to misalignment in this cross-over direction. Also as the grips can flex and twist along their length make sure they are not themselves twisted when checking alignment. Some “tube-set” may be required.
9. Don’t forget to fit a new tube clip to the tube before fitting it into the palm half handle and also check that there is not a plastic-tube-end plug left at the bottom of the tube socket.
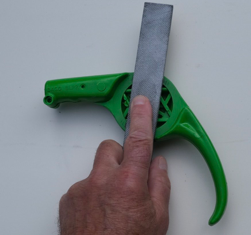
10. If it proves impossible to eliminate rock (wobble) of the grips (without over-tightening the M5 Pivot Nut) it may be necessary to file the handle bearing face as follows:-
Note: Even when perfectly flat the handle bearing face requires a degree of relief to allow for the plastics deflection under operational conditions.
-
11.Place a medium-cut flat hand file across the centre of
the bearing face, at right angles to the longitudinal axis
of the aluminium tube. Apply finger pressure, to the file,
central and within the pivot bearing area. Working with
with a slight elliptical action rub-file a relief keeping clear
of the area immediately next to, and adjacent to the tube
socket, and the bearing face opposite in the vicinity of,
and adjacent to, the hand-hold section of the handle.
Checking for wobble is done by pushing the assembled
handle halves apart. some misalignment is expected but
if excessive check that bolt-nut is not too-loose; if not it will be necessary to strip halves apart, cross-file, clean, oil and re-assemble again.
Note: If the Litter Plier has G2 tip-toe grips these will have been fitted to tubes with formed ends: G2 grip removal is best facilitated by: clamping the tubular leg (in the vicinity of the gripper) in a vice and then using a knife score the gripper through to the tube and peal-off with engineers pliers. . Check that the tube formed end has not been damaged or distorted and that they match. If they are damaged or distorted it may be possible to shorten both tubes by up to about 10mm. and reform by squeezing in a vice then filing the formed tube ends to match. To fit the G2 tip-toe grippers they will need to be warmed and soaped, or some Bostik 1782 clear adhesive applied, and squeezed between the forefinger and thumb to get them to slide onto the formed tube end.
It takes 15-20 minutes to make a new Litter Plier but more like 30+ minutes to fully refurbish a worn old one, so please allow the time and hopefully be pleased with the result. THE END ?